Samsung FRP lock is a security feature that prevents unauthorized access to your device after a factory reset. If you forget your Google account credentials or buy a second-hand Samsung phone with FRP enabled, you may be stuck on the verification screen and unable to use your device.
Fortunately, there are some free tools that can help you bypass Samsung FRP lock without password.Here are some of the best tools for bypassing Samsung FRP (Factory Reset Protection):
Samsung FRP Hijacker
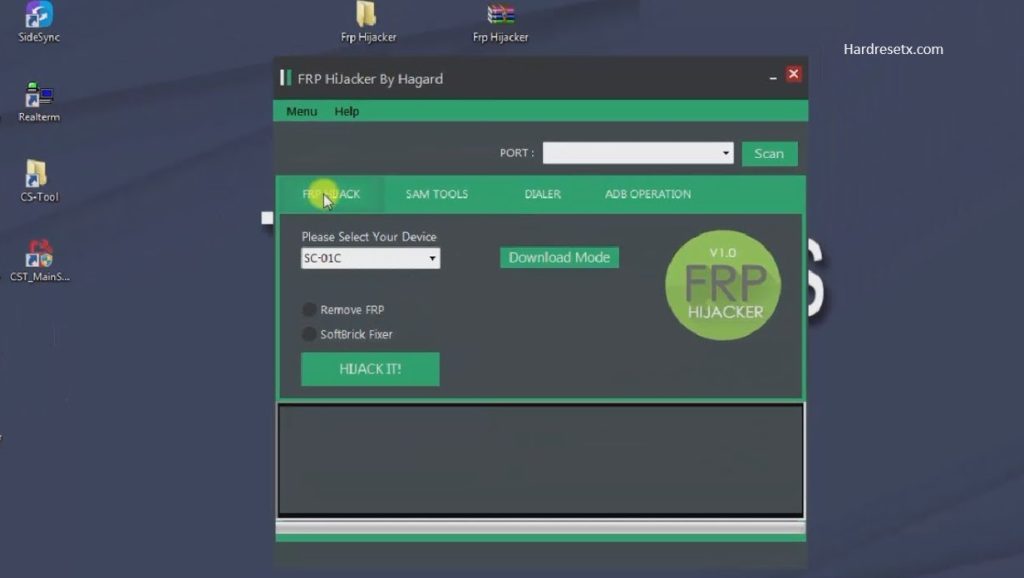
Samsung FRP Hijacker is a popular tool specifically designed to bypass Factory Reset Protection (FRP) on Samsung devices. Here’s a detailed overview of the tool, including its pros and cons:
Samsung FRP Hijacker Overview
Samsung FRP Hijacker is a utility developed by Haggard, primarily used for bypassing Google Account verification (FRP lock) on Samsung devices. This tool is particularly useful for users who have forgotten their Google account credentials and are locked out of their devices after a factory reset.
Hijacker Features
- FRP Bypass: The primary function of the tool is to bypass FRP lock on Samsung devices.
- ADB Operations: Perform various operations using ADB (Android Debug Bridge) mode.
- Soft-Brick Fixer: It includes a feature to fix devices that are soft-bricked.
- Combination File Method: Utilizes combination firmware files to bypass FRP.
- User-Friendly Interface: Simple and easy-to-navigate interface.
Pros:
- Specialized for Samsung: Designed specifically for Samsung devices, ensuring better compatibility and effectiveness.
- Multiple Methods: Offers different methods to bypass FRP, providing flexibility depending on the device and situation.
- Free: The tool is available for free, making it accessible to anyone needing to bypass FRP.
- Additional Features: Apart from FRP bypass, it offers features like ADB operations and soft-brick fixing, adding to its utility.
Cons:
- Technical Knowledge Required: The tool may require some technical knowledge to use effectively, especially for more advanced features.
- Potential Warranty Void: Using third-party tools to bypass FRP can potentially void the device’s warranty and violate terms of service.
- Security Risks: Downloading and using tools from untrusted sources can pose security risks, including malware.
- Compatibility Issues: May not work with the latest Samsung models or Android versions, as FRP methods are frequently updated by manufacturers.
How to Use Samsung FRP Hijacker:
- Download and Install: Download the Samsung FRP Hijacker tool from a trusted source and install it on your PC.
- Launch the Tool: Open the tool and connect your Samsung device to the PC using a USB cable.
- Select Mode: Choose the appropriate mode for your situation, such as “Remove FRP” or “Soft-Brick Fixer.”
- Follow Instructions: Follow the on-screen instructions to perform the desired operation. This might involve entering download mode or using ADB commands.
- Complete the Process: Once the process is complete, your device should be unlocked, and you can set it up without needing the previous Google account credentials.
Best Practices:
- Backup Data: Always ensure that you have backed up your data before attempting to bypass FRP, as the process may result in data loss.
- Download from Trusted Sources: Only download Samsung FRP Hijacker from reputable websites to avoid malware and ensure you have the correct version of the tool.
- Understand the Risks: Be aware of the potential risks, including security issues, legal implications, and the possibility of voiding your warranty.
Using Samsung FRP Hijacker can be an effective way to regain access to your Samsung device, but it’s essential to use it responsibly and with an understanding of the associated risks.
Odin3
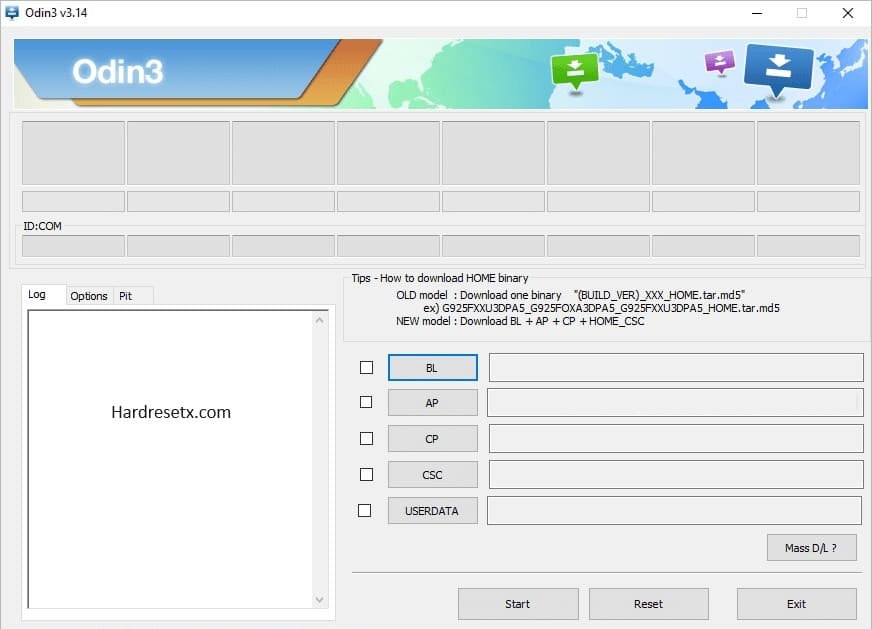
Odin3 is a utility software developed by Samsung used to flash firmware, custom recoveries, and other system images onto Samsung devices.
It is often used for tasks such as unbricking devices, upgrading or downgrading firmware, and installing custom ROMs or kernels.
Requirements:
- A Windows computer.
- A USB cable to connect your Samsung device to the computer.
- Odin3 software.
- The appropriate firmware or system image files for your device.
- Installed Samsung USB drivers.
Steps to Use Odin3:
Download and Install Odin3:
- Download Odin3 from a reliable source.
- Extract the downloaded file to a location on your computer.
Download Samsung Firmware:
- Download the appropriate firmware for your Samsung device from a trusted source.
- Extract the firmware files to a location on your computer.
Install Samsung USB Drivers:
- Ensure Samsung USB drivers are installed on your computer. These can typically be downloaded from the Samsung website or included in the Kies software.
Put Your Device into Download Mode:
- Power off your Samsung device.
- Press and hold the Volume Down + Home + Power buttons simultaneously.
- When you see a warning screen, press the Volume Up button to enter Download Mode.
Launch Odin3:
- Open the Odin3 executable file on your computer.
Connect Your Device:
- Use a USB cable to connect your Samsung device to the computer.
- Odin3 should recognize your device and display a message indicating that a device is added.
Load Firmware Files into Odin3:
- In Odin3, click on the appropriate buttons (BL, AP, CP, CSC) to load the corresponding firmware files.
- BL: Bootloader
- AP: Main firmware file (this may take a while to load)
- CP: Modem/Radio
- CSC: Consumer software customization (use the HOME_CSC file to keep user data, or CSC to wipe user data)
Configure Odin3 Options:
- Ensure that the “Auto Reboot” and “F. Reset Time” options are checked.
- Do not change any other settings unless you know what you are doing.
Start Flashing Process:
- Click the “Start” button in Odin3 to begin the flashing process.
- Wait for the process to complete. Your device will reboot automatically once the flashing is successful.
- You will see a “PASS” message in Odin3 indicating that the process is complete.
Complete Setup:
- Once your device reboots, you can set it up as new or restore your data if you chose to keep user data.
Important Notes:
- Flashing firmware can void your warranty and may result in data loss. Ensure you have a backup of your data before proceeding.
- Use the correct firmware files for your specific device model to avoid bricking your device.
- Ensure your device has enough battery life to complete the process.
D&G Password Unlocker
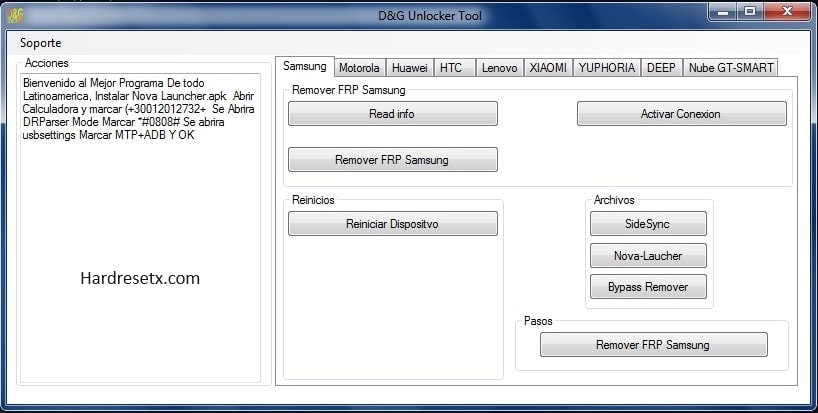
D&G Password Unlocker is a software tool used to bypass screen locks on Android devices, including pattern, PIN, password, and fingerprint locks. It can be useful for users who are locked out of their devices and need to regain access.
Requirements:
- A Windows computer.
- A USB cable to connect your Android device to the computer.
- D&G Password Unlocker software.
- Installed Android USB drivers.
Steps to Unlock Your Device with D&G Password Unlocker:
Download and Install D&G Password Unlocker:
- Download D&G Password Unlocker from a reliable source.
- Extract the downloaded file to a location on your computer.
Install Android USB Drivers:
- Ensure that the appropriate USB drivers for your Android device are installed on your computer. These can typically be downloaded from the device manufacturer’s website.
Launch D&G Password Unlocker:
- Open the D&G Password Unlocker executable file on your computer.
Connect Your Device:
- Use a USB cable to connect your Android device to the computer.
- Make sure your device is detected by the computer.
Select Your Device Model:
- In D&G Password Unlocker, select your device model from the list of supported devices.
Put Your Device into Recovery Mode:
- Follow the instructions provided by D&G Password Unlocker to put your device into Recovery Mode. This usually involves pressing a combination of buttons (such as Volume Up + Power) when the device is off.
Use D&G Password Unlocker:
- Once your device is in Recovery Mode and detected by the software, select the appropriate option to remove the screen lock.
- Click on the “Unlock” button to start the process.
Wait for the Process to Complete:
- The software will begin the process of removing the screen lock from your device.
- Wait for the process to complete. Your device may reboot several times during this process.
Access Your Device:
- Once the process is complete, your device should no longer be locked by a screen lock.
- You should be able to access your device without entering a password, PIN, or pattern.
Important Notes:
- Using D&G Password Unlocker may result in data loss. Ensure you have a backup of your data before proceeding if possible.
- Bypassing screen locks may violate the terms of service of your device manufacturer or carrier. Use this tool responsibly and only on devices you own or have permission to unlock.
- Ensure your device has enough battery life to complete the process.
- Always download tools from reliable sources to avoid malware or other security risks.
UnlockJunky
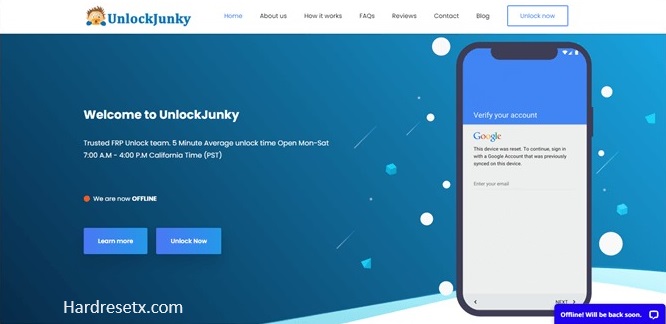
UnlockJunky is a professional service that helps users unlock their mobile devices, including removing FRP (Factory Reset Protection) locks, screen locks, carrier locks, and other types of restrictions. They provide remote assistance to unlock various devices.
Steps to Use UnlockJunky:
Visit UnlockJunky Website:
- Go to the official UnlockJunky website UnlockJunky.
Select Your Device and Service:
- On the homepage, select your device brand and model from the dropdown menus.
- Choose the type of unlock service you need (e.g., FRP removal, carrier unlock, screen lock removal).
Provide Device Information:
- Fill in the required details about your device, such as IMEI number and any additional information requested.
Purchase the Service:
- Follow the instructions to make a payment for the service. Prices vary depending on the type of unlock and the device.
Download and Install TeamViewer:
- UnlockJunky uses TeamViewer to provide remote assistance. Download and install TeamViewer on your computer from the TeamViewer website.
Schedule an Appointment:
- After the payment is confirmed, schedule an appointment for the remote unlocking session.
- You will receive an email with the appointment details and further instructions.
Prepare Your Device:
- Ensure your device is fully charged and connected to a stable internet connection.
- Have a USB cable ready to connect your device to the computer.
Start the Remote Session:
- At the scheduled time, open TeamViewer and connect with the UnlockJunky technician using the provided session ID and password.
- Follow the technician’s instructions to connect your device to the computer.
Unlock Your Device:
- The UnlockJunky technician will remotely access your computer and perform the necessary steps to unlock your device.
- This process may take some time, so be patient and ensure your device remains connected.
Verify the Unlock:
- Once the process is complete, the technician will confirm that your device is unlocked.
- Test your device to ensure it is fully functional and the lock has been removed.
Important Notes:
- Using UnlockJunky is a paid service, so be prepared to make a payment for the specific unlock service you need.
- Ensure you have a reliable internet connection for the remote session to avoid interruptions.
- Make sure to follow all instructions provided by the UnlockJunky technician to ensure a smooth unlocking process.